jQuery Pin It Button For Images is a free plugin that allows your readers to easily pin images in your blog posts by simple hovering over them and clicking a button. It is highly customizable, so you can adjust it to your own needs. You can download it on the WordPress plugin repository. There is also a Pro version of the plugin available.
Contents
- 1 Selection settings
- 2 Visual settings
- 3 Downloading an older version of the plugin
- 4 Troubleshooting
- 5 Common issues and Frequently Asked Questions
- 5.1 “Something went wrong” when pinning
- 5.2 Can I set up an image to be a repin of the original image?
- 5.3 Empty settings page
- 5.4 Plugin does not work on mobile devices
- 5.5 Enabled/disabled classes don’t work in Visual Composer
- 5.6 “Pin It” button is visible but I cannot click it
- 5.7 “Pin it” button doesn’t show up on non-img elements
- 5.8 No “Pin it” button on a slider
- 5.9 Pin It button does not bring up multiple images to choose from
- 5.10 Two “Pin It” buttons
- 5.11 Disable Pin it button from social media icons
- 5.12 Broken icon on the button
Selection settings
Enabled and disabled classes
Enabled and disabled classes are an easy way to activate or deactive the “Pin it” button on certain images. Let’s see how it works.
In this example I’ll use the Disabled classes, but the Enabled classes setting works the same way (except you use it to show the “Pin it” button only on certain images instead of hiding the button on certain images).
Let’s start with the settings panel. Our current Disabled classes setting looks like the following:

Classes are separated by semicolons, so we have two classes currently available: wp-smiley and nopin. Let’s use the latter to disable the button on an image in a blog post. If you want to use another class, feel free to add it (make sure you separate it using a semicolon).
In order to use the class you need to modify the class attribute of the image you want to disable. You can do that using one of two options:
- Using WordPress’ image editor
- Using text editor
Using WordPress’ image editor
- Open WordPress’ image editor

- Locate the Image CSS Class setting (it’s in the advanced options)
- Add the class to that setting (nopin in our case). If its value is not empty, make sure you add a space before the value you’re adding.
- After adding the value, the class setting should look like the following:

- Update the image (the button is in the right bottom corner).
- Save the post
Using text editor
- Switch to the Text tab in the post editor.
- Locate the code of the image. It usually looks like the following:
<img class="alignright" src="http://www.highfiveplugins.me/wp-content/image.png" width="500" height="250" />
- As you can see, the image already has the class attribute. If it doesn’t, you can add it by adding class=”” after <img (make sure there’s a space before the class attribute)
- Now you can add the disabled class of your choice (in our example it’s the nopin class) to the image’s class attribute. After that modification the code of the image should look like two following:
<img class="alignright nopin" src="http://www.highfiveplugins.me/wp-content/image.png" width="500" height="250" />
- Save the post
Once you add the class to the image using one of the two described ways to do that, the image shouldn’t show the “Pin it” button anymore.
If need be, you can do the process in reverse – first, find the class attribute of the image you want to delete, then choose one of the classes (if there are many), add it to the Disabled classes setting and save plugin’s settings. That will work too.
If the image you want to disable the button on doesn’t have a class and you can’t add it (e.g. a plugin generates its code), you can (in most cases) disable it using the Image selector setting. Using that setting requires knowledge of jQuery and I couldn’t possibly cover it in a tutorial. If that’s the case, ask your web developer for help or use the support forum.
Minimum image resolution
Minimum image resolution is a set of constraints that allows one to disable smaller images from showing the “Pin it” button. One can set different size constraints for small devices because on smaller devices images will be, inevitably, smaller. When checking the image against the constraints set, the size of the image on screen is taken into account. That means if an image is 1500 pixels high and wide “naturally” but on screen, its size is only 200 pixels high and wide, it will be treated as a 200×200 image.
Example
Let’s say you have an image at the bottom of every blog post, like a signature or an ad, and you would like to disable it. The easiest way to do that would be:
- Check the size of the image
- Choose the smaller number of the two (height and width)
- If the width is smaller, set the minimum width for small and large screens. If the height is smaller, set the minimum height for small and large screens. The value you use should be the width/height of the image + 1
- Save settings and check if the image stopped showing the button
Visual settings
Pin linked images
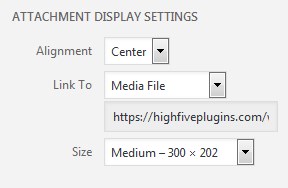
When checked, if you link an image to its full-resolution version, the plugin pins the full-resolution version. Linking an image to its full-resolution version can be done when adding an image. In the Insert Media screen, in the Attachment Display Settings section set the Link to property do Media File. That’s it.
This setting produces HTML code that looks like the following:
<a href="http://www.highfiveplugins.me/wp-content/image_large.jpg"><img class="alignright wp-image-58" src="http://www.highfiveplugins.me/wp-content/image_small.jpg" width="500" height="250" /></a>
Transparency value
Transparency value is responsible for the hover effect over the image. Set it to 0 to disable the grey overlay when user hovers over the image.
Scale Pin Image (PRO only)
When checked, the plugin will scale down the size of the “Pin it” button for smaller screens. The scaling down is simply making sure that the button won’t be too large on smaller screens. If you’re happy about the size of the button on mobile devices, leave this setting unchecked. Below is a table of max button height and width based on screen width. If the button is smaller than the size limit, it will be rendered full size.
| Screen width | Max button height/width |
|---|---|
| up to 575px | 50px |
| 576px to 767px | 60px |
| 768px to 991px | 80px |
| 992px to 1199px | 110px |
| 1200px and more | always full size |
Downloading an older version of the plugin
Every released lite version of the plugin is available here, in the “Other versions” section. To install it, first make sure you have deactivated and deleted the version you’re using currently. Then download the zip file of the version you would like to use. Now you need to install it using the Plugin Upload feature. You can read about it here in the Install a Plugin using the WordPress Admin Plugin Upload section.
Troubleshooting
If you have any issues with the plugin, report them in the plugin’s support forum. I do my best to help people who are experiencing issues with the plugin. If you’re a PRO user, you can report an issue using the email address you got after purchasing the plugin.
Few things I would like you to do when reporting a problem:
- If you’re using a caching plugin (like W3 Total Cache) on your website, clear its cache. That might fix the issue.
- One thread = one person + one problem.
If you have a problem, start a new thread. Don’t post in a thread started by someone else saying “I have the same problem”. Any “me too” posts will be ignored. Start a new thread and answer only there. If another problem will occur somewhere in the future, start a new thread instead of reviving the old one. This lets me manage the support forum and make sure everyone gets help. - Include a URL address of the website and make sure the plugin is activated.
Unless it’s a settings page issue or an error that crashes the site, I need the URL of the website and the plugin activated for debugging. If the plugin works but things aren’t rendering as they should, let me know which browser you are using. - If your issue is resolved, please let me know.
Common issues and Frequently Asked Questions
“Something went wrong” when pinning
If you repeatedly get the message that says “Sorry! Something went wrong on our end. Please try again.” after trying to pin an image, in almost all cases it’s caused by the hosting of your website. It’s usually caused by some server settings that prevent Pinterest from downloading the image. Please email your hosting provider, describe that you’re unable to pin images from your site and ask them if they could fix it.
Can I set up an image to be a repin of the original image?
Yes, that feature is available in the PRO version of the plugin. You can read more here.
Empty settings page
If you’re using Cloudflare and have the settings page empty, there’s an easy fix for that. In Cloudflare’s ‘Speed’ settings, please disable Auto Minify for JavaScript and purge the cache. If you’re using any other caching plugin, clear its cache too. Then clear your browser’s cache or switch to incognito mode. Now you should be able to see the settings page correctly. Sometimes you need to give it a few minutes after disabling Auto Minify and accessing the settings page.
You can disable Auto Minify, adjust your settings and then enable Auto Minify again, which should work just fine. Cloudflare refuses to fix this issue and suggests what I suggested.
If you’re up for it, you can keep Auto Minify enabled but disable it on the plugin’s JavaScript file using Page Rules. You can read about page rules here. To do that, in Cloudflare’s Page Rules add a new rule with a URL address like this: http://www.yoururladdress.com/wp-content/plugins/jquery-pin-it-button-for-images/js/jpibfi.admin.js*, add the Disable Performance setting and Save and Deploy the rule. Once you force refresh the plugin’s settings page everything should work properly.
Plugin does not work on mobile devices
The free version shows the “Pin it” button when user hovers over an image. That works perfectly fine for desktop machines. When it comes to mobile devices, in most cases it doesn’t work at all. On some devices the user has to tap the image for the “Pin it” button to show up. In other words, this solution is not perfect for mobile devices. That’s why I added “show always” mode that shows the “Pin it” button over images all the time. That mode is available only in the Pro version of the plugin. If your audience is accessing your website using mobile devices, consider buying it.
Enabled/disabled classes don’t work in Visual Composer
If you’re using Visual Composer to add images (e.g. using the Image Element) and want to add or remove the Pin it button to/from images, the enabled/disabled classes settings won’t work. That’s because Visual Composer won’t add the class directly to the image element, but to its container instead. Because of that, the easiest way to make it work is to:
- Add class nopin to the Image Element or the whole gallery
- Change the image selector setting to:
.jpibfi_container img:not(.nopin img)
That should do the trick.
That’s usually caused by your theme’s CSS. In most cases adding the following line of CSS fixes the issue:
a.pinit-button { z-index:10000000 !important; }
The free version of the plugin only supports the img tag. If you have an image that’s being shown using another tag (e.g. a div), you need the Pro version to show the “Pin it” button on such an image. Click here to read more.
The plugin doesn’t work properly with most sliders. If it’s working with your slider, that’s most likely by accident, not by design. It doesn’t work with sliders because each slider plugin works differently and it’s pretty much impossible to handle all possible scenarios. Currently there isn’t a slider plugin that I recommend that works with the plugin.
The plugin is designed to share the image the user clicks on. If you want to have multiple images to choose from, consider using Pinterest’s widget builder or another plugin.
The plugin adds exactly one “Pin it” button. If you have more than one “Pin it” button showing up on your website, it’s most likely either another plugin adding it or a browser extension/phone app adding it.
If you’re using any kind of caching plugin, try adding the following URL to the ignore URLs:
/wp-content/plugins/jquery-pin-it-button-for-images-pro/css/client.css